Q. How many times can you read the word 'Scrunchie'
in one blog post?
Agenda:
1. Apologies.
2. Waffle.
3. Scrunchie step-by-step.
4. The finished product.
Lets begin.
My apologies for not posting! I knew this new years resolution was going to be a hard one and I think I have partly failed every one I set out on. However, it is a new month tomorrow (today technically being Thursday now!) so I give myself permission to start over.
So I have been doing a lot of sewing recently and on reading February Company magazine I stumbled across this project in a feature on current trends. I had a little think. Could I do this? Well physically make it, yes. But could I wear it? Well... Well indeed! The rest is history because I am as I write this. Yes - I am wearing a scrunchie. And I'm quite proud of it!
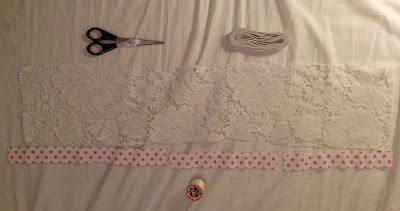
'How do I make one too!?', you holler? I shall tell you. The project in Company was slightly different to what I did, I made one with piping. That's the polka dot part you can see in the photo above.
You will need:
20 x 90 cm of any fabric (I used lace)
2.5 x 90 cm of any fabric (I used white and pink polka dot)
15 cm elastic (I used flat, round would be fine)
Needle and thread
Scissors
To embark you will need to fold both pieces of fabric length-ways, with the pattern inside on the big piece and outside on the smaller piece. This is important! [Ignore that my polka fabric is in three pieces, I was using a vintage fabric that wasn't long enough so I sewed them together first.] For the piping you will be tucking the smaller folded strip of fabric inside the larger folded strip, with the folded edges pointing the same direction. Line up the raw edges (of which there should be four) making a neat little sandwich, then you can get sewing your scrunchie!
You will notice that it looks a bit weird, but that's because you're looking at the inside of your scrunchie. When you have sewed all the way down the raw edge, turn it inside out. You will now see why the folding of the fabric was so important! You should be able to see the pattern on the piping and the scrunchie. You are? Winning.
It is now time to make it more scrunchie-like rather than tubey-like-y. Grab your elastic and start to feed it through whilst holding on to the other end. You need a scrunched up (the pun is poetic, isn't it?) piece of fabric with a piece of elastic in it. Grab the two ends of the elastic and lay them over each other by about a cm or two and sew back and fourth across a cm stretch of it. It will be really annoying if this comes undone.

Now time to sew up the rest of it. You want to match up the piped bit and start from there, take two raw edges, pressing them outside edge to outside edge (so the raw edges tuck inside your scrunchie) and sew about a cm in. Do this until it's too awkward to do anymore (you'll see) then poke the raw edges in and do a neat little stitch, across what should hopefully be, a small-ish hole. You are now done. Sit back and tie up your hair - with your new scrunchie!
You could use corresponding or clashing fabric, or sack off the piping - or make the decoration along the seam more simple by poking ribbon lace in instead of a folded piece of fabric!
Got a few projects and recent buys to put up - hopefully you won't have too long to wait before I can write them! Now go get sewing!
Enjoy! Naomi x
A. Ten times. Including the question. And one 'scrunched'.


